What are sprouts? Sprouts are young plants that have begun germination and growth after seeds have been soaked in water.
Unlike seedlings, sprouts are usually harvested and eaten before they develop roots and true leaves, as their initial growth makes them highly nutritious baby greens packed with vitamins, minerals, enzymes and other healthy compounds to boost our salads, smoothies and more.
In this article
Why Grow Sprouts at Home?
Many folks these days are opting to grow more of their own foods right in their kitchens. While it may seem like extra work, sprouting your own greens is honestly a breeze and has some great benefits!
For starters, sprouts are packed with vitamins, minerals, enzymes and other healthy stuff your body loves. They’re also way more affordable than buying them pre-sprouted from the store.
Plus you get to eat them fresh, sometimes just days after the seeds are planted.
Who doesn’t want nourishment that’s grown with care and harvested at its nutritional peak?
What Types of Sprouts to Start With
If you’re new to sprout growing, I’d recommend beginning with some basic varieties that are foolproof to get the hang of it.
- Alfalfa, broccoli and clover seeds are tried and true sprouts beloved for salads. They germinate quickly—usually 3 to 5 days—and have a mild flavor enjoyable for both kids and adults. Lentil and radish sprouts are also super simple to cultivate and add crunch and interest to dishes.
- As you gain experience, some other nutritious sprouts to try include chickpeas, beans and peas. Chickpea sprouts add protein, fiber and a nutty taste to salads.
- Mung bean sprouts grow briskly into long, silky greens and bring a delightful crunch.
- Snap pea and snow pea sprouts have an irresistibly sweet flavor.
- For variety of color, texture and nutrients, take a look at adzuki bean, Amaranth, quinoa and wheatgrass sprouts too. Each one brings its own unique benefits. Amaranth sprouts, for instance, contain antioxidants, magnesium and iron. Wheatgrass is famously alkalizing and packed with vitamins, minerals and plant-based chlorophyll.
- As you get more experienced, you can branch out to spicier varieties like mustard, chili pepper, garlic or onion.
But there’s really no need to overcomplicate things when you’re learning the ropes. Stick with the classics until you feel confident, then have fun experimenting.
What Equipment Do You Need?
Sprout growing is seriously low-budget and space efficient.
- All you really need is a jar, some cheesecloth or mesh screen, rubber bands and of course some seeds.
- Mason jars work beautifully since their mouths are nice and wide for easy access.
- You can also use canning jars or short wide-mouth containers from the recycling bin.
- As for keeping the seeds moist, cheesecloth or mesh bags secured with a rubber band do the trick.
Germinating Sprouts Made Easy
Now that you’ve selected some sprouting seeds, it’s time for the fun part – getting them to germinate!
The process is remarkably simple and requires only a jar, water and a little patience.
To sprout using the jar method:
- Rinse and drain your chosen seeds thoroughly. This removes any residues that could promote mold growth later on.
- Place 1-2 tablespoons of seeds in the bottom of your glass jar. You don’t want them packed in densely. Leave plenty of room for the seeds to swell and the sprouts to grow upright.
- Fill the jar about 3/4 full with lukewarm water. The warmth will help kickstart the germination process. Swish to remove any air pockets trapped among the seeds.
- Secure your cheesecloth or mesh lid with a rubber band, then set the jar at an angle to drain off excess water. This keeps the seeds from sitting in moisture.
- Rinse and drain twice a day. Swish the sprouts gently to loosen any clinging sediment, then pour out the water and set to drain again.
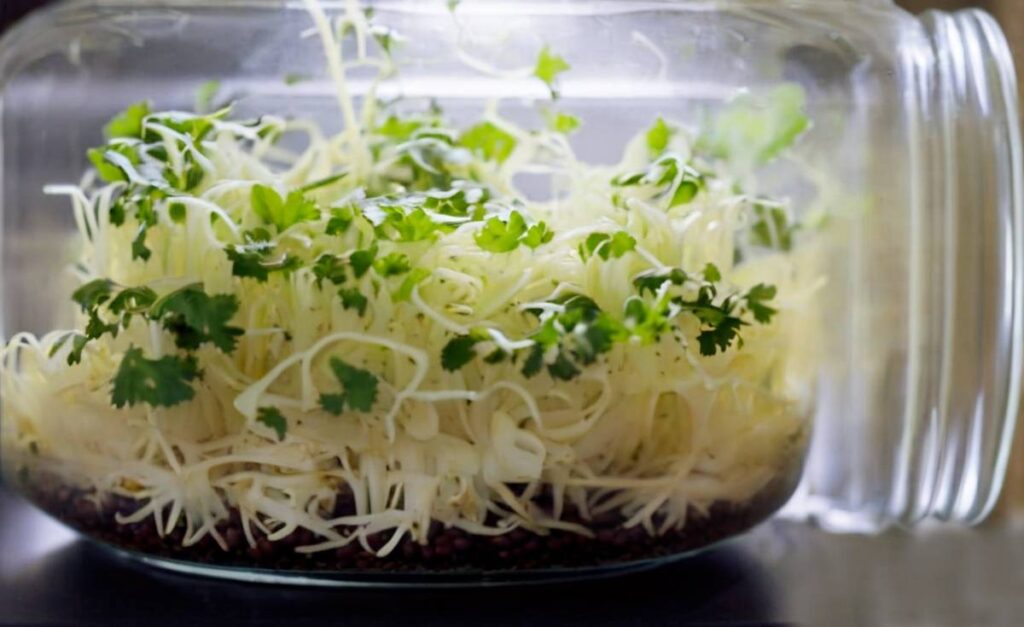
- In 3-5 days, you’ll see the first tiny green shoots emerging! Continue rinsing until the sprouts are your preferred size for eating. Then it’s time to harvest and enjoy!
Don’t overthink it! Simplicity is key when starting out. You’ll be harvesting those nutrient-dense sprouts in no time without breaking the piggy bank.
With just water and a little daily maintenance, you’ll be growing a bounty of nutritious sprouts on your kitchen counter.
It’s such an easy way to incorporate living whole foods into your diet. Let me know if any part of the process needs more explanation!
Frequently asked questions
Are sprouts the same as microgreens?
No, sprouts and microgreens are not the same thing. Sprouts refer specifically to germinated seeds where the radicle (root) and shoot are clearly visible but the seed shell may still be attached. Common sprouts include alfalfa, broccoli, and bean sprouts.
Microgreens are very young seedlings or baby greens that are harvested soon after the seed leaves (cotelydons) have opened. They have both a developed root system and visible true leaves. Popular microgreen varieties include arugula, broccoli, and mustard greens.
How big do sprouts and microgreens grow?
Sprouts are usually only a few mm to 1-2cm in length while microgreens can range from 0.5-8cm depending on the variety and days to harvest.
Which one is more nutritious (sprouts or microgreens)?
Nutritionally, sprouts tend to be higher in vitamins, minerals, and enzymes since they’ve only just begun photosynthesis. Microgreens often have a more developed flavor profile.
What are spouts and microgreens used for?
Sprouts are generally used raw in salads, sandwiches, and dishes requiring a stem-like crunch. Microgreens can be used like herb leaves or sprouts depending on size and variety.
Happy sprout gardening!